Unlock the Secrets of Android's Private DNS Mode: Your Ultimate Guide to Online Security!
2025-06-23
Author: Olivia
The Importance of DNS and Its Hidden Risks
Did you know that every action you take online, from browsing your favorite websites to searching for information, starts with a Domain Name System (DNS) query? This system translates user-friendly domain names into numerical IP addresses that devices can understand. Without it, you'd face the daunting task of remembering jumbled numbers for each website!
However, here's the catch: standard DNS operates without encryption, meaning your online activities can be easily intercepted by prying eyes, especially on public Wi-Fi networks.
Why You Need Private DNS Mode NOW!
Imagine you're at a coffee shop, casually browsing the web or accessing work-related tools on your Android device. If someone else is on the same network and has the right skills, they could snoop on your non-encrypted queries, revealing everything from your research to confidential URLs. This is where Private DNS Mode comes into play, shielding your online activities by encrypting your DNS queries.
Step-by-Step: How to Activate Private DNS on Your Android Device
Enabling Private DNS Mode on Android is a breeze, and here's how to do it based on your operating system version.
For Android 11 and Newer Users:
1. Download the 1.1.1.1 + WARP app from Cloudflare.
2. Launch the app and toggle the slider from 'Disconnected' to 'Connected' to activate the service.
Note: If you need to re-enable Private DNS, you may need to locate the app in the Google Play Store since it won’t be in your app drawer. Just a small annoyance from Cloudflare!
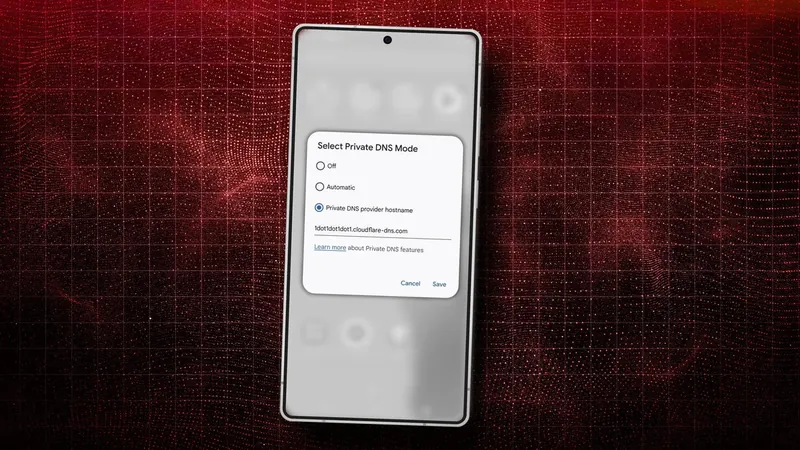
For Android 10 and Older Users:
1. Open your device’s settings.
2. Look for 'Private DNS' settings.
3. Enter a DNS provider's hostname. While you can opt for several options, I highly recommend Cloudflare's address: 1dot1dot1dot1.cloudflare-dns.com for its speed and security. Also, consider using:
- Google DNS: dns.google
- Quad9: dns.quad9.net
- OpenDNS: 208.67.222.222
4. Once set, save your changes.
Verify Your Security Measures!
You can ensure everything is up and running smoothly by going to your Android browser and entering http://1.1.1.1/help. If you see "Using DNS over TLS (DoT): Yes," then congratulations! You're fully protected.


 Brasil (PT)
 Canada (EN)
 Chile (ES)
 Česko (CS)
 대한민국 (KO)
 España (ES)
 France (FR)
 Hong Kong (EN)
 Italia (IT)
 日本 (JA)
 Magyarország (HU)
 Norge (NO)
 Polska (PL)
 Schweiz (DE)
 Singapore (EN)
 Sverige (SV)
 Suomi (FI)
 Türkiye (TR)
 الإمارات العربية المتحدة (AR)